
Quick Start, Set up a LabRat and Logging Inator#
This is a guide to get start logging with LabRat and a Inator logging device. Currently LabRat is at an early stage of development with lots likely to change.
Requirements
A computer with Python installed
A microprocessor (we are using a Pico W which has built in Wifi)
A DHT11 temperature and humidity sensor (we used the version from Seeed Studios)
The first step is to set up the Inator to log data from. We will make a DHT_Inator in this example where we connect a DHT11 Temperature and Humidity Sensor to our Pico. But everything here can be applied to any sensor you would like to use.
Inator set up#
To set up the pico as a logger follow the instructions in the tutorial to install the CircuitPython firmware
The next step is to connect the DHT sensor.
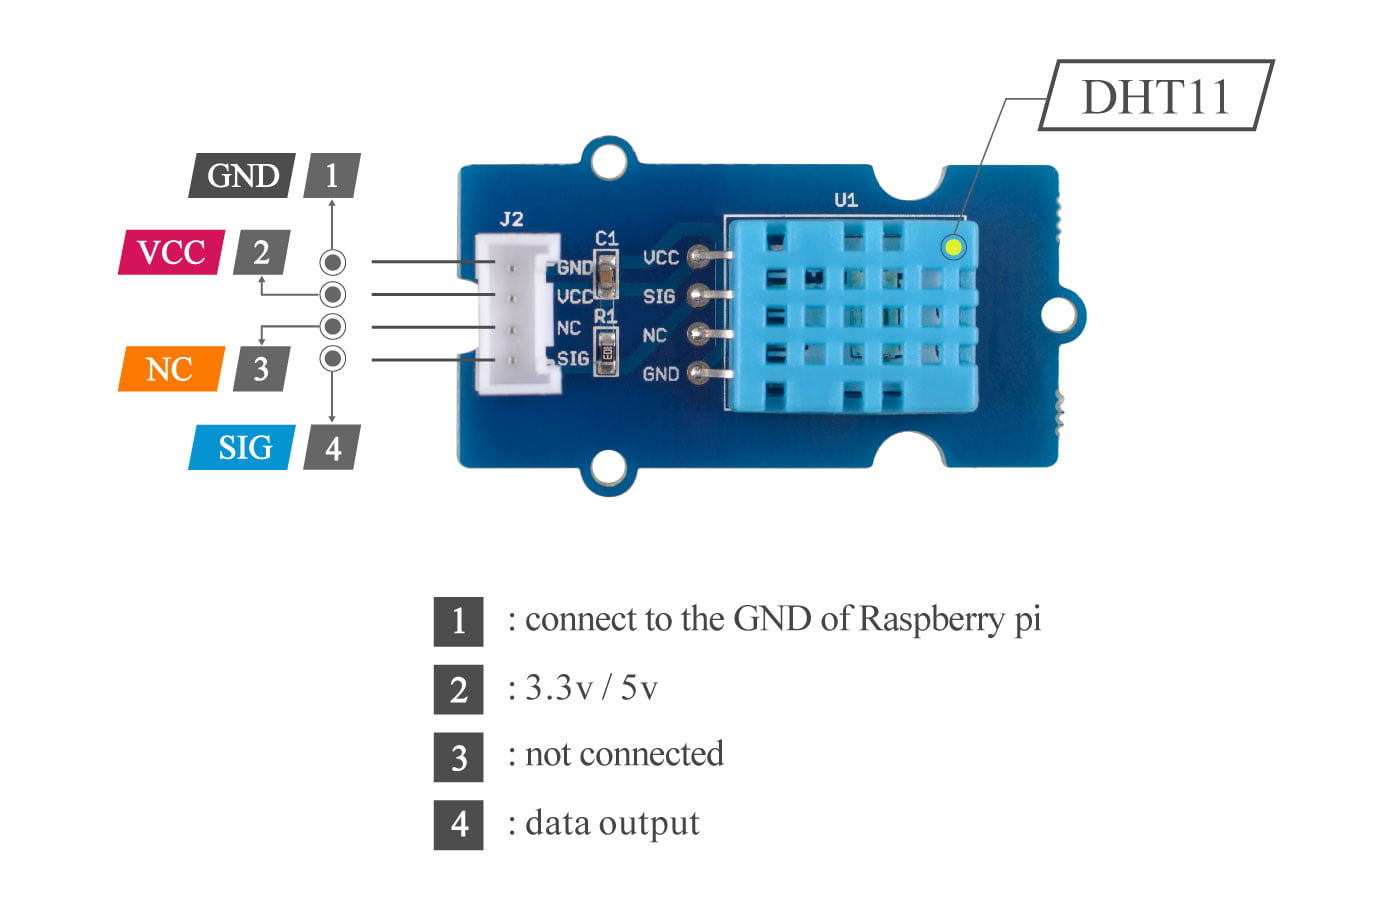
Make the following connections:
DHT11 Pin |
Pico Pin |
|---|---|
GND |
GND |
VCC |
3.3V out |
NC |
Not connected |
SIG |
GP0 |
Next we will set some test code on the Pico to connect to the DHT11.
A library is required, it is not included in the core CircuitPython package you uploaded to the Pico but can be very easily added using the instructions here.
import microcontroller
import time
import json
import board
import adafruit_dht

dht = adafruit_dht.DHT11(board.GP0)

#Retrieve variables from settings.toml
inatorname = os.getenv("INATORNAME")
accTime = os.getenv('ACQUIRETIME')  #how often to acquire and transmit data

while True:
    temp = dht.temperature
    humidity = dht.humidity
    #Create dictionary
    json_dict = {"inator":inatorname,"temperature":temp,"humidity":humidity}  # Send data with JSON syntax
    json_data = json.dumps(json_dict)
    print(f"{json_data}")
    time.sleep(accTime)
This should print the temperature and humidity recorded by the DHT11 to your serial connection in the correct format. For more info on how to connect the Pico to serial and upload code the instructions are here.
You also need to create a settings.toml with the following values
INATORNAME = "hackinator"
ACQUIRETIME = 5
LabRat set up#
THe next step is to install the LabRat control and logging software. The set up can be done in two ways. First Go to the repo[inator-project/LabRat] and download the repo contents, either use Git or just download the zip. Or get it from (PyPI) [https://pypi.org/project/labrat_project/], though this is not as up to date as the repo.
The first step is to install the necessary Python libraries. Files for installation from pip or conda (or mamba) are in the installation folder
conda env create -f environment.yml
pip install -r /path/to/requirements.txt
poetry install
If you now run
python labrat_log.py -h
or
poetry run labrat_log.py -h
You should get something like the following
             ('-.    .-. .-')  _  .-')     ('-.     .-') _
            ( OO ).-.  ( OO )( ( -O )   ( OO ).-.(  OO) )
 ,--.       / . --. / ;-----.\ ,------.   / . --. //     '._
 |  |.-')   | \-.  \  | .-.  | |   /`. '  | \-.  \ |'--...__)
 |  | OO ).-'-'  |  | | '-' /_)|  /  | |.-'-'  |  |'--.  .--'
 |  |`-' | \| |_.'  | | .-. `. |  |_.' |  | |_.'  |   |  |
(|  '---.'  |  .-.  | | |  \  ||  .  '.'  |  .-.  |   |  |
 |      |   |  | |  | | '--'  /|  |\  \   |  | |  |   |  |
 `------'   `--' `--' `------' `--' '--'  `--' `--'   `--'

               Your Lab Monitoring Needs Met

                           ##########
                        ################
                       ##################
                       ###################
                     ######################
                    #######################   +######
                     #####################  +##########
                    ###################### +##     .####
                    ####################    #.      .####
        #########   ##################               ####
    ################# ################              #####
  ####################  ##############             +####
 ####################### ######                   ######
########        ############   .#########.     +######+
#######           #######-  -########################
######     ##      #####  ###########   +#########
#######   ####         +#############-               -
 #############        ######-    #####               ###+
  ###########       -#####        #####+              ###+
      ###           #####          ######              ###
                   #####            .######-          ####
                   #####       .#-    -#########  .######
                   -####        .##      ###############
                    ####         ###        .#######
                     ####+      .###
                      #############
                       +#########+
                           .+-


            Readying Logging at:2026-06-27T20:41:43+01:00
usage: labrat_log.py [-h] [-quick_start] [-secrets SECRETS] [--config TOML_STRING]

Purpose: Connect sensors and log to DB

options:
  -h, --help            show this help message and exit
  -quick_start          ✅ -quick_start to run a set up wizard 🧙
  -secrets SECRETS      The path to the toml fil with secrets, such as log ins are kept
  --config TOML_STRING  TOML config as a string, e.g. --config '[CONFIG]
                        AUTOBROW = true'
Connecting it together#
Now we will combine the logging Pico with the LabRat programme to save data from a sensor into a sqlite database. There are several ways to make this connection. Choose which ever you prefer/need.
If we are connecting over serial first connect the pico to your computer using the USB cable. the code we set up at the beginning of this quick_start
import os
import sys
import microcontroller
import time
import json
import board
import adafruit_dht
import supervisor

dht = adafruit_dht.DHT11(board.GP0)

def hola(input_buffer:str):
    print(f"Hello from {inatorname}")

def reading():
    try:
        temp = dht.temperature
        humidity = dht.humidity
        if temp is None:
            print("⚠️ DHT read failed")
        else:
            #Create dictionary
            json_dict = {"inator":inatorname,"temperature":temp,"humidity":humidity}  # Send data with JSON syntax
            json_data = json.dumps(json_dict)
            #print(f"{json_data}")
        return json_data
    except RuntimeError as e:
        print(f"Sensor read error: {e}")
        return None
#Retrieve variables from settings.toml
inatorname = os.getenv("INATORNAME")
accTime = os.getenv('ACQUIRETIME')  #how often to acquire and transmit data
recTime = os.getenv('RECONTIME') #how oftern to reconnect in seconds

last_publish = 0
input_buffer = ""

while True:

    now = time.monotonic()
    if supervisor.runtime.serial_bytes_available:
        char = sys.stdin.read(1)
        if char in ("\n", "\r"):
            if input_buffer:
                print(f"Received command: {input_buffer}")
                if input_buffer == "hola":
                    print(f"Hola from {inatorname}")

                if input_buffer == "read":
                    json_data = reading()
                    if json_data:
                        print(f"{json_data}")

                input_buffer = ""
        else:
            input_buffer += char


    if now - last_publish >= accTime:
        json_data = reading()
        if json_data:
            print(f"{json_data}")

        last_publish = now

    time.sleep(0.01)
Where we would have the same settings.toml file saved on the pico. We shall call the Inator hackinator and acquire for 30 seconds
INATORNAME = "hackinator"        # Name of the device, will be used when sending data (put name between the quote marks)
ACQUIRETIME = 5       # The value (in seconds) of how often to acquire data and log for
To add the inator to the database we need a device_info.json file which can be saved onto the device
{
  "devices": [
    {
      "device_name": "hackinator",
      "device_guid": "",
      "num_sensors": 2,
      "device_info": "Has DHT11 sensor",
      "device_type": "pico",
      "device_location": "TBD",
      "device_active": 1,
      "connection": "Serial",
      "sensors": [
        {
          "sens_name": "temperature",
          "measures": "Temperature",
          "returns": "Celsius",
          "calib": "1:1",
          "range": "0-50",
          "info": "Seeed DHT11 on GP0",
          "comments": "None"
        },
        {
          "sens_name": "humidity",
          "measures": "Humidity",
          "returns": "%",
          "calib": "1:1",
          "range": "0-100",
          "info": "Seeed DHT11 on GP0",
          "comments": "None"
        }
      ],
      "controls":[],
    }
  ]
}
The most important thing here is that the device_name and sens_name must match the names sent from the pico, otherwise the logging will fail
The next step is to find out which COM port the Pico is on.
On Windows go to the device manager and look under ports to see which COM port is connected
On linux
ls /dev/tty*
Will display a list of all tty devices. The pico will probably be either ttyAM0 or ttyAM1 if in doubt plug and unplug it. If you get permission errors run
sudo adduser <red-user> dialout
We can now (finally) set up the LabRat,
If we are connecting over MQTT we will use the following code on the pico
import os
import time
import json
import supervisor

import microcontroller
import adafruit_connection_manager
import wifi
import adafruit_requests
import adafruit_minimqtt.adafruit_minimqtt as MQTT
import adafruit_logging as logging

import adafruit_dht

#set up sensor
dht = adafruit_dht.DHT11(board.GP0)

#Function for Wifi Connection
def conn_wifi(wifi_ssid, wifi_password):
    print(f"\nConnecting to {wifi_ssid} network...")
    try:
        wifi.radio.connect(wifi_ssid, wifi_password)
        wifi_con = True
    except OSError as e:
        print(f"❌ OSError: {e}")
        wifi_con = False

    return wifi_con

# Retrieve variables from settings.toml
inatorname = os.getenv("INATORNAME")
ssid = os.getenv("WIFI_SSID")
password = os.getenv("WIFI_PASSWORD")
# MQTT Topic to publish data from Pico to MQTT Cloud Broker
mqtt_topic = os.getenv("INATORTOPIC")
accTime = os.getenv(
    "ACQUIRETIME"
)  # how often to acquire and transmit data - should be number in settings
recTime = os.getenv(
    "RECONTIME"
)  # how oftern to reconnect in seconds - should be number in settings

wifi_con = False

# Initalize Wifi, Socket Pool, Request Session
pool = adafruit_connection_manager.get_radio_socketpool(wifi.radio)
ssl_context = adafruit_connection_manager.get_radio_ssl_context(wifi.radio)
requests = adafruit_requests.Session(pool, ssl_context)

# Connect to the Wi-Fi network
wifi_con = conn_wifi(ssid, password)

if wifi_con:
    print("✅ Wifi!\n")
    print("IP-Adress is", wifi.radio.ipv4_address)

    # MQTT Topic to publish data from Pico to MQTT Cloud broker
    mqtt_topic = f"{mqtt_topic}/{inatorname}"

    # Define callback methods which are called when events occur
    def connect(mqtt_client, userdata, flags, rc):
        # This function will be called when the mqtt_client is connected
        # successfully to the broker.
        print("Connected to MQTT Broker!")
        print(f"Flags: {flags}\n RC: {rc}")

    def disconnect(mqtt_client, userdata, rc):
        # This method is called when the mqtt_client disconnects
        # from the broker.
        print("Disconnected from MQTT Broker!")

    def subscribe(mqtt_client, userdata, topic, granted_qos):
        # This method is called when the mqtt_client subscribes to a new feed.
        print(f"Subscribed to {topic} with QOS level {granted_qos}")

    def unsubscribe(mqtt_client, userdata, topic, pid):
        # This method is called when the mqtt_client unsubscribes from a feed.
        print(f"Unsubscribed from {topic} with PID {pid}")

    def publish(mqtt_client, userdata, topic, pid):
        # This method is called when the mqtt_client publishes data to a feed.
        print(f"Published to {topic} with PID {pid}")

    def message(client, topic, message):
        print(f"New message on topic {topic}: {message}")

    # Set up the MQTT client
    mqtt_client = MQTT.MQTT(
        broker=os.getenv("BROKER"),
        port=os.getenv("PORT"),
        username=os.getenv("MQTT_USERNAME"),
        password=os.getenv("MQTT_KEY"),
        socket_pool=pool,
        is_ssl=True,
        keep_alive=3600,
        ssl_context=ssl_context,
    )
    # Set up logging if having connection difficulties
    # mqtt_client.logger = logging.getLogger('test')
    # mqtt_client.logger.setLevel(logging.DEBUG)

    # Connect callback handlers to mqtt_client
    mqtt_client.on_connect = connect
    mqtt_client.on_disconnect = disconnect
    mqtt_client.on_subscribe = subscribe
    mqtt_client.on_unsubscribe = unsubscribe
    mqtt_client.on_publish = publish
    mqtt_client.on_message = message

    print(f"Attempting to connect to {mqtt_client.broker}:{mqtt_client.port}")
    mqtt_client.connect()
    print(f"Publishing to {mqtt_topic}")

    # Time tracking
    last_time = time.monotonic()
    last_publish = 0

    while True:
        if wifi.radio.connected:
            try:
                mqtt_client.loop()

                now = time.monotonic()
                if now - last_time >= accTime:
                  #read sensors
                  temp = dht.temperature
                  humidity = dht.humidity
                  if temp is None:
                        print("⚠️ DHT read failed")
                        continue

                  # Create dictionary
                   Send data with JSON syntax
                  json_data = (
                        '{"inator":"%s","temperature":%.1f,"humidity":%.1f}'
                        % (
                            inatorname,
                            temp,
                            humidity
                        )
                  )

                  print(f" | ✅ Sending JSON ('key':'value'): {json_data}")
                  mqtt_client.publish(mqtt_topic, str(json_data))
                  last_time = now
                except MQTT.MMQTTException as e:
                  print("MQTT error:", e)
                  try:
                    mqtt_client.reconnect()
                  except Exception:
                    time.sleep(5)

                time.sleep(0.5)
        else:
            print(f"Wifi Disconnected - will attempt to reconnect every {recTime} mins")
            wifi_con = conn_wifi(ssid, password)
            if not wifi_con:
                # wait recTime until reattempt connection
                time.sleep(recTime)
            else:
                # Attemp reconnect (for example if e is EBDAF as MQTT connection is down)
                mqtt_client.reconnect()
else:
    print("❌ Wifi!\n")
    print("Connection attempt failed")

while True:

    time.sleep(accTime)
Where we would have the following settings.toml file saved on the pico. We shall call the Inator hackinator and acquire for 30 seconds. The topic we will publish to is going to be /data/hackinator which is constructed in the code from INATORTOPIC and the INATORNAME
INATORNAME = "hackinator"        # Name of the device, will be used when sending data (put name between the quote marks)
INATORTOPIC = "/data"       # The topic to subscribe to on the MQTT broker
ACQUIRETIME = 30       # The value (in seconds) of how often to acquire data and log for
RECONTIME = 3600       # The value (in seconds) of how often to attempt to reconnect to the wifi network if lost
WIFI_SSID = ""         # Fill in with your WiFi network's name
WIFI_PASSWORD = ""     # Fill in with your WiFi network's password
PORT =               # Fill in the port you are connecting to the MQTT Broker
MQTT_USERNAME = ""  #The user name on the MQTT broker that can publish
MQTT_KEY = ""       #The password for the MQTT User
BROKER = ""         #The address for the MQTT broker
To add the inator to the database we need a device_info.json file which can be saved onto the device
{
  "devices": [
    {
      "device_name": "hackinator",
      "device_guid": "",
      "num_sensors": 2,
      "device_info": "Has DHT11 sensor",
      "device_type": "pico",
      "device_location": "TBD",
      "device_active": 1,
      "connection": "MQTT",
      "sensors": [
        {
          "sens_name": "temperature",
          "measures": "Temperature",
          "returns": "Celsius",
          "calib": "1:1",
          "range": "0-50",
          "info": "Seeed DHT11 on GP0",
          "comments": "None"
        },
        {
          "sens_name": "humidity",
          "measures": "Humidity",
          "returns": "%",
          "calib": "1:1",
          "range": "0-100",
          "info": "Seeed DHT11 on GP0",
          "comments": "None"
        }
      ]
    }
  ]
}
The most important thing here is that the device_name and sens_name must match the names sent from the pico, otherwise the logging will fail
Now we will add our device to the database.
Create the following quick.toml file (it can be found in the installation folder)
VERSION = 1.0

[CONFIG]
    "AUTOBROW" = true
    "ALLOW_SETUP" = true

[CONNECTIONS]
   [CONNECTIONS.FLASK]
   "KEY" = "secret" #This is only okay for the brief set up
   "LOCAL_ON" = true
       [CONNECTIONS.FLASK.SETUP]
       "ROUTE" = "/setup"
Run the quick set up code
python labrat_log.py -secrets <path to quick.toml> -quick_start
this will start your browser with a form to fill in.
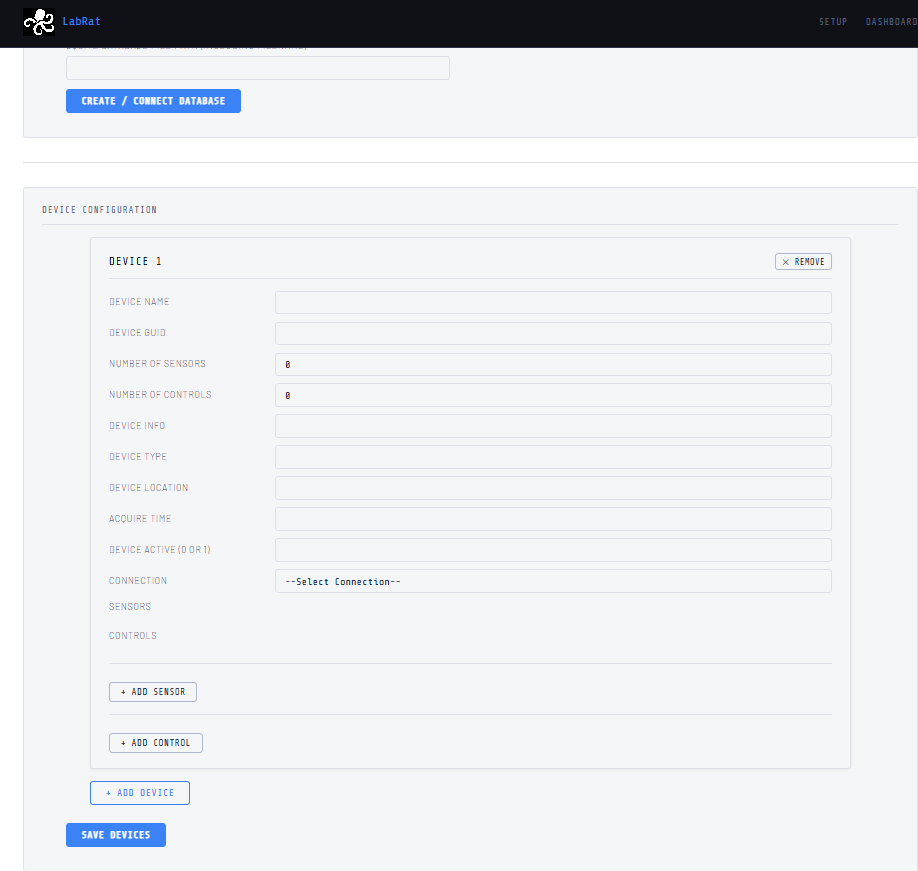
And click “Create/Connect Database”. You should get a message to say it is connected
Then fill in the form for the device
Device Name : hackinator
Device GUID : THIS WILL BE FILLED AUTOMATICALLY
Number of sensors : set to 1
Number of controls : leave as 0
Device Info : My first hackinator
Device Type : Pico
Device Location : Next to me
Acquire Time : 5
Device Acitve : 1
Connection : Choose Serial or MQTT as appropriate
Then Click “Add Sensor”
Sens Name : humidity
Measures : Humidity
Returns : %
Calib : 1:1
Range : 0-100
Info : DHT11 on GP1
Comments : None
Data Type : Select Contin
Click “Add Sensor” again
Sens Name : temperature
Measures : Temperature
Returns : Celsius
Calib : 1:1
Range : 0-50
Info : DHT11 on GP1
Comments : None
Data Type : Select Contin
Click “Save Devices”
You should then get a new page with the device json shown.
Close the browser and end the programme on the terminal (type quit or Ctrl+C)
We can now start our logging
Create another toml with fuller details, filling in or removing the Serial or MQTT connections as appropriate
VERSION = 1.0

[CONFIG]
    "AUTOBROW" = false # whether to automatically open the browser or not
    "ALLOW_SETUP" = false
    "COMMAND_QUEUE" = true # whether to allow a command COMMAND_QUEUE to run

[LOGGING]
    [LOGGING.SQLITE]
        [LOGGING.SQLITE.MYDB]
            "FILE" = "path to the database as set up in quick start"
            "CREATE" = false


[CONNECTIONS]
    [CONNECTIONS.MQTT]

        [CONNECTIONS.MQTT.HIVE]
            "USERNAME" = ""
            "KEY" = ""
            "BROKER" = ""
            "PORT" = 8883
            "TOPIC" = "/intatorlog/#"
            "TLS" = true

    [CONNECTIONS.SERIAL]  # Serial connection details

        [CONNECTIONS.SERIAL.COM8] # Details of a Serial connection
            "VERB" = True
            "PORT" = "FIND OUT" # The name of the serial port
            "BAUD" = "115200" # The baud rate for the port

    [CONNECTIONS.TTY]  # Run and monitor a terminal
        [CONNECTIONS.TTY.NAME]  # Name for the terminal connection NAME should be changed and be unique

    [CONNECTIONS.FLASK]
        "VERB" = True
        "KEY" = "TO GENERATE SEE LABRAT README"
        "HOST" = "127.0.0.1"
        "PORT" = 8090

        "LOCAL_ON" = true
        [CONNECTIONS.FLASK.HTTP]
            "ROUTE" = "/datafind"

        [CONNECTIONS.FLASK.DASH]
            "ROUTE" = "/dash"

        [CONNECTIONS.FLASK.SETUP]
            "ROUTE" = "/setup"

        [CONNECTIONS.FLASK.DEVICES]
            "ROUTE" = "/api/devices"

        [CONNECTIONS.FLASK.UPDATE_CONNS]
            "ROUTE" = "api/conns"
Now start your logging
python labrat_log.py -secrets <Path to the toml file>
in your browser got to https//127.0.0.1:8090/dash to get your dashboard