
Traffic Lights - Writing the code#
Our program is now much longer but there are not too many unfamiliar elements.
import board
import digitalio
import time

carGreen = digitalio.DigitalInOut(board.GP0)
carYellow = digitalio.DigitalInOut(board.GP1)
carRed = digitalio.DigitalInOut(board.GP2)
button = digitalio.DigitalInOut(board.GP3)

carGreen.direction = digitalio.Direction.OUTPUT
carYellow.direction = digitalio.Direction.OUTPUT
carRed.direction = digitalio.Direction.OUTPUT
button.direction = digitalio.Direction.INPUT

runningtime = 0                   #Variable to hold the elapsed time

def changelights():
    carGreen.value = False
    carYellow.value = True
    time.sleep(2)
    carYellow.value = False
    carRed.value = True
    time.sleep(6)
    for i in range(10):
        carYellow.value = not  carYellow.value
        time.sleep(0.5)
    carRed.value = False
    carGreen.value = True

while True:
    carGreen.value = True
    if button.value == True and (time.monotonic() - runningtime) > 5:
        time.sleep(1)
        changelights()
        runningtime = time.monotonic()
    else:
        pass
int switchstate = 0;
//pin numbers
 int carRed = 2; //pin for Red light on car set
 int carYell = 3; //pin for Yellow light on car set
int carGreen = 4; //pin fro Green light on car set

int redMan = 5; //pin for red man
int greMan = 6; //pin for green man

int buttpin = 7;// pin for button

int normalDelay = 1000;
int crossdelay = 2000;

void setup() {
  // put your setup code here, to run once:

  //SET UP PINS FOR LIGHTS AS OUTPUTS
  //Car lights
  pinMode(carRed, OUTPUT); //red light
  pinMode(carYell, OUTPUT); //yellow light
  pinMode(carGreen, OUTPUT); // green light

  //Crossing lights
  pinMode(redMan, OUTPUT);
  pinMode(greMan, OUTPUT);

  //SETUP PIN FOR BUTTON AS INPUT
  pinMode(buttpin, INPUT);
}

void loop() {
  // put your main code here, to run repeatedly:

  //WAIT FOR BUTTON TO BE PRESSED:
  //check button
  switchstate = digitalRead(buttpin);
  //BUTTON IS PRESSED
  if (switchstate == LOW){
  //make sure green to car

    digitalWrite(carRed, LOW);
    digitalWrite(carYell, LOW);
    digitalWrite(carGreen, HIGH);
    //\\red to people
    digitalWrite(redMan, HIGH);
    digitalWrite(greMan, LOW);

  }
  else{
  //1. TURN GREEN CAR LIGHT TO YELLOW - GREEN OFF
    digitalWrite(carRed, LOW);
    digitalWrite(carYell, HIGH);
    digitalWrite(carGreen, LOW);
    //\\red to people
    digitalWrite(redMan, HIGH);
    digitalWrite(greMan, LOW);
    //2. delay
    delay(normalDelay);
    //3. TURN YELLOW CAR LIGHT OFF, RED ON
    digitalWrite(carRed, HIGH);
    digitalWrite(carYell, LOW);
    digitalWrite(carGreen, LOW);
    //\\red to people
    digitalWrite(redMan, HIGH);
    digitalWrite(greMan, LOW);
    //4. WAIT
    delay(normalDelay);
    //5. TURN RED MAN OFF - GREEN MAN ON
    digitalWrite(carRed, HIGH);
    digitalWrite(carYell, LOW);
    digitalWrite(carGreen, LOW);
    //\\red to people
    digitalWrite(redMan, LOW);
    digitalWrite(greMan, HIGH);
    //6. WAIT
    delay(crossdelay);
    //7. TURN GREEN MAN OFF- RED MAN ON
    digitalWrite(carRed, HIGH);
    digitalWrite(carYell, LOW);
    digitalWrite(carGreen, LOW);
    //\\red to people
    digitalWrite(redMan, HIGH);
    digitalWrite(greMan, LOW);
    delay(normalDelay);
    //8 TURN RED CAR LIGHT OFF - GREEN ON
    digitalWrite(carRed, LOW);
    digitalWrite(carYell, LOW);
    digitalWrite(carGreen, HIGH);
    //\\red to people
    digitalWrite(redMan, HIGH);
    digitalWrite(greMan, LOW);
  }
Running the program, you should find only the green car light turned on. Now press the button and watch the sequence unfold. Once again, try to follow the code through and see all the steps play out.
There are a couple new useful concepts we have used in this program which we will go through below.
Defining functions#
We have used a new technique here to slightly simplify our code. In the same way that CircuitPython comes installed with various functions that carry out specific actions (e.g. time.sleep()), we can define our own custom functions for use in our programs.
To define your own function, simply use def with the name of our function.
Functions typically follow the structure seen below:
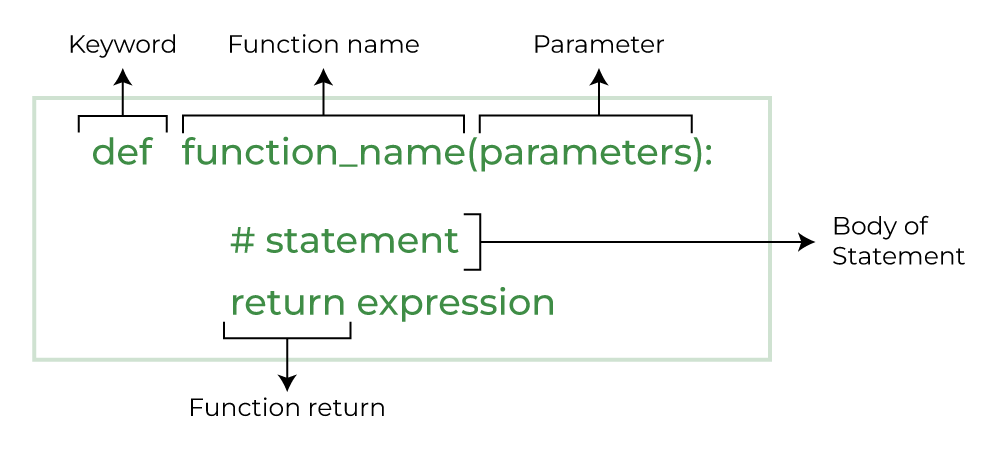
For example, a function for converting Celcius to Fahrenheit
def celcius_to_far(temp):
    temp = (temp * 1.8) + 32
    return temp
Our changelights() function doesn’t folow this structure exactly as it doesn’t have any parameters to input nor does it return any value. This is often the case for functions in CircuitPython, where we may be running through a sequence of actions (e.g turning lights on and off and waiting) rather than performing calculations.
Note
In our program, we don’t actually need to define a function. We could write out the full sequence of actions within our while loop and the result would be the exact same. Rather, functions are often used to improve the structure of your code or when code might otherwise be repeated.
for loops#
Within our changelights() function, we used a new type of structure - a for loop:
 for i in range(10):
    carYellow.value = not  carYellow.value
    time.sleep(0.5)
This is the code that caused the lights to blink.
Similar to while loops, for loops make the Pico repeat the actions within their code block. The main difference is that we preset the number of times this loop will be repeated, using for i in range(_):. As would be expected, range(10) means 10 repetitions of the code block.
Note
It is important to remember that almost all counting in Python begins at 0 - for example, the i in for i in range(10) will begin at 0 and count up to 9.
A useful feature of for loops is that we can use the local variable i within the code block itself. For example, try changing the code to that seen below:
 for i in range(5):
    carYellow.value = not carYellow.value
    time.sleep(i)
You should find that now when the button is pressed, we have still see a blinking sequence but it gets increasingly slow. This is because on each iteration, the time.sleep() function takes the variable i as its argument, meaning pauses become increasingly long. For the first loop, we have time.sleep(0), for the second time.sleep(1), etc.
Tip
The variable i in for i in range(): is completely arbitrary. We can replace it with whatever, e.g. x, count, etc.
Monitoring time#
Until now, we haven’t mentioned the actual purpose of the runningtime variable and how we have used it. Together with a new function time.monotonic(),
we can track time continuously to ensure that the lights don’t change too frequently.
Firstly runningtime = 0 creates a variable we can use to store the elapsed time and initially sets it to zero.
Once the changelights() function has finished running, we have
runningtime = time.monotonic()
The function time.monotonic() returns the number of seconds since your Pico was powered on. It returns a decimal number (or float) and is accurate to the millisecond.
Each time the changelights() function is executed, runningtime is updated and assigned the value of time.monotonic() at that end of the light changing sequence. After this, time.monotonic() keeps on counting as before while the runningtime variable holds onto the time recorded at that specific moment.
This comes into use as we add the condition:
if button.value == True and (time.monotonic() - runningtime) > 5:
By subtracting time.monotonic() from runningtime, we get the number of seconds since the last button press sequence ended (as this is when the runningtime variable is updated). By having the condition that this difference is greater than 5, we are requiring that at least 5 seconds pass before the end of one button sequence and the start of another. If this is not satisfied pass tells the Pico to move on and start the loop again.
Time functions
Unlike time.sleep(), time.monotonic() is not a blocking function so does not get in the way of other actions. This means it is often essential in programs with multiple inputs and outputs changing at the same time.
For example, if you wanted to take a temperature measurement every 2 minutes and a light measurement every 5 minutes, you could use time.monotonic() in a similar way to we have here, while time.sleep() would not work.
More conditionals
Here we have included two conditions in our if statement by using ... and .... As logic follows, this requires that both conditions are satisfied before the code below is executed.
We can also use ... or ... when we only need either of two conditions to be satisfied.